How To Do No-Prep Restorations
Does the thought of preparing a bunch of teeth — particularly on a young person — give you trepidation? Sure it does!
While sometimes we need to prepare teeth, it’s safe to say the less we can prepare teeth (yet still meet the patient’s goals), the better. In this article, I’ll discuss some methods you can use to not prepare teeth at all, yet still deliver fantastic restorations.
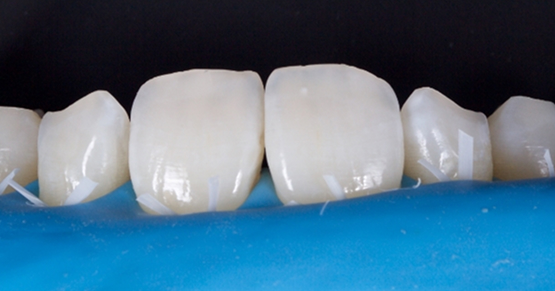
The first key to making this possible is that the teeth you’re dealing with must be smaller than the desired final size once they’re restored. This could be due to a genetic condition such as peg laterals (Fig. 1) or a case that involves excessive wear (Figs. 2–3).


Why not crowns?
Yes, you could consider placing crowns on all the latter patient’s teeth and restore him that way. He is very young and clearly had significant functional issues, so I don’t know about you, but that makes me really nervous — and not only because I feel there’d be a high risk of him breaking porcelain. Think about it: He is destroying his teeth and he’s also destroying his wear guard, as seen in Fig. 4.

So why would we think it would be any different with crowns? Think about what a nightmare broken crowns would be for both you and him. Now add the fact that the patient isn’t even 30 years old; crowns are starting to sound even worse, aren’t they?
What are the chances that if you place crowns on all of this patient’s teeth, he’s going to make it his whole life with all his teeth? My bet is that he would not. Sure, he might if you took the functional issues out of the equation, but if you can’t eliminate those — which, by the way, we’ve been unable to find a way to do — then chances are, he won’t.
In a case like this, when pretty much all the teeth are worn (yet still in the right position), you can add to them, restoring what has been worn away and at the same time adding a protective layer. Yes, you would prepare the teeth lightly to gain defined margins, but I would argue that if you pick the right restorative materials, you don’t even have to do that in this case.
Material selection
For me, the right material is either resin or a hybrid ceramic. If you’re not familiar with hybrid ceramics, these are typically CAD-CAM materials that, while classified as all-ceramics, have a resin component. Examples include Vita’s Enamic, 3M’s Lava Ultimate and GC’s Cerasmart. One big factor that will influence your material choice will be your access to using CAD-CAM processes. If you or your lab don’t have this ability, you’ll be limited to using composite resin.
Given I have a CEREC in my office and I wanted to be efficient as possible in treating the case, my decision was to use my CEREC and Vita’s Enamic. I picked Enamic because you can etch it for bonding and I’ve used it many times before so I know it can mill very finely (in fact, less than 0.3 mm thick). Going this route allowed me to premill my no-prep onlays (Fig. 5), and bond them to the teeth (Fig. 6), which saved me a ton of chair time and made things much more efficient.


The anterior teeth were then done chairside with direct composite. Could this entire case have been done with direct composite? Yes, for sure … but it would have been more work and taken more time. (By the way, I did the anteriors with direct composite and, yes, it was a bunch of work!)
Approach
If you’re saying to yourself, “That’s great, but what if the teeth aren’t in the right place, or not all of the teeth are undersized or have excessive wear like the peg lateral case above, yet I still don’t want to prepare the teeth?” Never fear — there’s a solution for that too! The problem is, it involves orthodontics. Name your last adult patient who was excited about doing orthodontics — they don’t exist, do they?
The good news is that if our patients really want the best solution and we do a good job of communicating with them, most of the time they[ll do the orthodontics. Once they’re committed, the first step is to have the orthodontist move the teeth into the proper position and then, if needed, take off the brackets (Fig. 7) so you can resize the teeth (Fig. 8).


One important thing to note is that these teeth have been resized but they’re still not aligned correctly because the bonding to resize them was done according to the root angulation and desired final size, not the current position. We don’t expect it to look perfect here — all we want is the right size and shape. We don’t care about alignment, and in fact, if the roots are still tipped, our bonding must follow that.
It’s then the orthodontist’s job to finish alignment of the teeth and make things look right, as you see in Fig. 9:

It’s important to note that this is the same bonding you saw in Fig. 8; the difference is that the teeth are in the right place now. If you are by chance saying, “Why don’t I just have my orthodontist stick the teeth where they belong, take all their stuff off, and then I’ll do the bonding?” … well, that’s a topic for another time. Let’s just say things will almost always — or should I say just plain always — end up compromised. Stay tuned and I’ll go into that more in another article.
FOUNDATIONS MEMBERSHIP
New Dentist?
This Program Is Just for You!
Spear’s Foundations membership is specifically for dentists in their first 0–5 years of practice. For less than you charge for one crown, get a full year of training that applies to your daily work, including guidance from trusted faculty and support from a community of peers — all for only $599 a year.

By: John Carson
Date: October 21, 2017
Featured Digest articles
Insights and advice from Spear Faculty and industry experts


