A Step-by-Step Guide to Fabricating the Protrusive Record
By Dave St. Ledger on March 4, 2017 |Taking records and indices on patients can be challenging in the beginning. But as always, with repetition and experience, we move towards proficiency.
We all at some point or another toiled or still toil over gathering an accurate centric relation record (or a record taken in seated condylar position). It is the Holy Grail of data gathering! It is nebulous. It is esoteric. Despite its mysticism, it has little value on its own.
When taking records, each step is no more or less important than the one before or the next to come. The centric record may be a bit more involved and gratifying to achieve, but tells us nothing about the other mandibular positions a patient may move toward.
A number of articles ago, I wrote on the importance of the facebow transfer. This article explores the protrusive record, an afterthought to some because it’s the presumed ease of execution. If taken lightly, mistakes can be made.
This article will give some insights on:
- The purpose of taking a protrusive record
- Materials to use when taking a protrusive record
- How to fabricate a wax platform
- How to replicate a wax platform
- When to use which material
Purpose of the protrusive record
It is possible in dental school you were asked to set your articulator’s condylar settings to a set number, either on Frankfort or Camper’s plane. It may have been for dentures, yet anecdotally may be used as typical for a set up on any case.
For those of you new to using this record, you will soon find that even condylar settings on a single patient may vary dramatically, from left to right.
The protrusive record allows a clinician to extrapolate all mandibular movements: maximum intercuspal position (MIP), protrusive end to end, lateral excursive, and the pathways to them. Of course I mean all mandibular movements but the seated condylar position as well as how the mandible works against the maxilla. By teaching the patient how to protrude their mandible and “bite over their front teeth,” we can then measure the steepness or the shallowness of each of their articular eminences. These are the bony slopes the mandible travels downward and forward.
After fabricating this record, we can use it to bring diagnostic casts together on an articulator and adjust the condylar guidance settings to establish that patient’s settings unique to them. From this record, along with a sound facebow, centric record and accurate casts, the articulator is now a jaw simulator for that patient.
Materials for taking a protrusive record
Historically, the protrusive is made with Master wax from Great Lakes Orthodontics, a rigid wax made malleable when needed.
There are times, however, when other materials may benefit both the clinician and patient in ease of execution. Occlusal schemes, molar relationships and overbites may play a role in desiring an alternative material. One material I found helpful is ACU-flow bite registration material, also from Great Lakes Orthodontics. Examples will follow with images.
Fabricate and replicate a wax platform
For the sake of brevity, the steps for fabrication and replication were put together since they are basically the same.
In the images that follow, you will see a previously fabricated wax platform with an “M” on it. That is the “master” wax platform that acts as a stencil so all future platforms may be cut the same way. Use these images to size up the angles to cut and make your first one. Make a bunch, ask your staff to act as patients and try some of them in, making sure you can cover the occlusal tables, preferably from at least the cuspids to the first or second molars. When you find the one that fits that description, make it the master, clean it, and place an “M” on it. Your staff can now use that to fabricate dozens using the steps below, ready for use at any time!

- You will need a scissors and a bowl of hot water.

- Immerse the wax in the water until it becomes “al dente” – soft and malleable, but not floppy and gooey.

- Fold the wax exactly in half and make a crease. Cut along that crease. You now have two equal pieces of wax; each piece makes one wax platform.

- Take one of the two pieces and fold it again, exactly in half. Place it on a flat table or lab bench surface and press flat, but do not squish and flatten, losing its thickness.

- This is where we combine making and replicating steps. This image illustrates a simple method by transposing these pieces of wax and cutting the shape, just like third-grade art class. Remember, all we do every day is just high end arts and crafts!


- The platforms are identical and ready for use.
How the materials are used
This segment is about thinking outside the box. The article itself is a guideline to offer assistance in making these platforms and, ultimately records, as it is tried and true. But the bottom line is sometimes you just cannot manage with just one way of thinking. Think for yourself. The sole goal is to get imprints of teeth, maxillary and mandibular, where the mandible is more forward than where it would exist in a maximum intercuspal position (MIP). I state it that way because some bites are more challenging to deal with using the methods above:
- Class II molar with a deep overbite
- Class II molar with an anterior open bite
- Class I molar with a deep overbite
- Class III molar with an anterior open bite
This is all patient dependent and not gospel. Three examples are illustrated below:
- Class I molar with a reasonable overbite and overjet
- Class II molar with a deep anterior segment
- Class II molar with an anterior open bite
The last two modify what you were taught in the above steps, largely because that simple wax platform is either too thin, too short or both to obtain enough tooth imprints to articulate the casts later. When these patients translate their mandible down the articular eminence and reach forward, they often create too much interocclusal space for a standard master wax platform.


This patient is easy and compliant, with a Class I molar relationship. Look at the edges of the anterior teeth. Notice how #8 fits perfectly with #25 and #26, end-to-end wear and he is only 16 years of age.


This woman is the Class II with a deep anterior segment. When she protrudes, the interocclusal space is too much. In this case, we went double thickness, heating two platforms together for extra thickness. It works great!

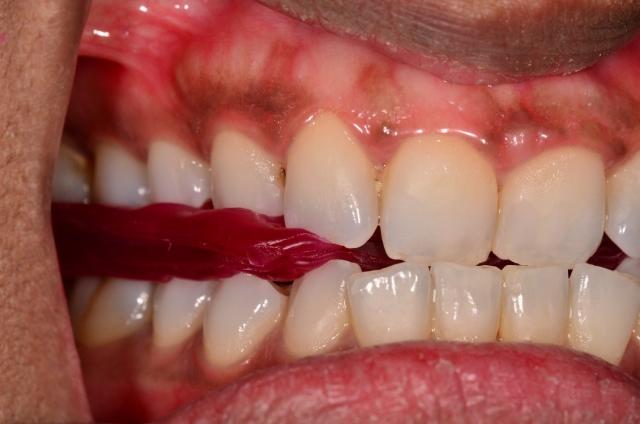
The last patient is a Class II with and anterior open bite and a retrognathic mandible. This image is when she is in full protrusive. A standard wax platform would not fit.


In this instance, Accuflow bite registration is used and easily occupies the space needed to provide a stable protrusive record to bring to the articulator.
Despite the details outlined in this article, the protrusive record is by far the fastest and easiest of all the bite records. Despite its simplicity, care must be used at each step to ensure comfort for the patient and accuracy of the record enabling a reproducible result on the articulated casts.
Like all things, the result of the step you are on is only as good as the one previous. Thank you for your time in reading this article. I hope it was helpful.
(Click this link for more dentistry articles by Dr. Dave St. Ledger.)
David St. Ledger, D.D.S., Spear Visiting Faculty, Spear Moderator and Contributing Author
FREE COURSE: Facebow Transfer
Now that you've read about fabricating the protrusive record, ensure you deliver the correct information with a facebow transfer. In this free course, you'll learn rationale behind the facebow, the differences in types of facebows and more.
WATCH NOW