A restorative practice is often kept busy by chronic denture wearers who complain of denture movement during function. For patients with extremely narrow ridges, the resorption of edentulous ridges underneath dentures is challenging for denture retention. Thankfully, the Straumann RidgeFit implants system was developed for these specific situations.
RidgeFit implants consists of a one-piece, tissue-level implant with an Optiloc prosthetic connection available in an endosteal diameter of ∅2.4 mm, with varying lengths of 10 mm, 12 mm, and 14 mm.
RidgeFit Implants: A Visual Essay
The visual essay below is of an 85-year-old woman who has been a regular patient in our office for years. She lost her teeth when she was young and has worn complete dentures for over 40 years and recently inquired about the possibility of improving the retention of her dentures.
Upon CBCT evaluation, it was verified that placement of conventional implants would be challenging due to the resorptive pattern of her ridges; however, her case was suitable for the RidgeFit implants system.
To provide an adequate reference for implant placement, we utilized her pre-existing dentures, duplicating them as a surgical template. Once the implants were placed and three months were allotted for osseointegration, the implants were actively loaded. The patient was satisfied with the overall esthetics of her dentures, so it was decided to utilize her pre-existing dentures further and pick up the prosthetic connection of the implants, mitigating the cost of a new denture. In the end, the patient was delighted with the results.
Below are images of the procedure's steps illustrating how to convert existing dentures to implant overdentures for a chronic denture wearer with narrow ridges utilizing RidgeFit implants. It represents a simple alternative technique that may substantially improve a patient's quality of life.
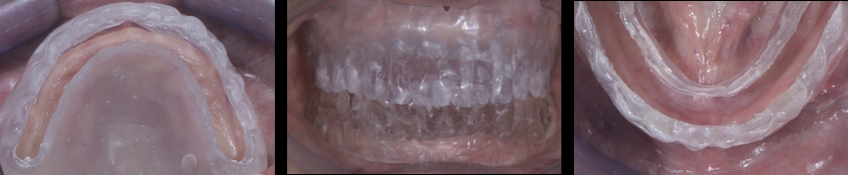
Figure 1: Frontal and lateral views of the patient smiling with the existing dentures.Figure 2: Intraoral frontal and lateral views of the existing dentures.Figure 3: Note the narrowness of the ridges in these frontal and occlusal views.Figure 4: Note the narrowness of the ridges in these CBCT images.Figure 5: Existing dentures were duplicated into clear acrylic to be used as surgical guides.Figure 6: Frontal and occlusal views of the surgical guides. Note the occlusal openings created to allow for visualization of the paralleling posts during surgery.Figure 7: The maxillary arch during surgery. The surgical guide was used to ensure the future emergence of the implant was within the intaglio surface.Figure 8: Six implants were placed in the maxilla following the manufacturer's recommendation. Note the narrowness of the ridge.Figure 9: A maxillary occlusal view of the implants' final position before and after the tissue was sutured.Figure 10: The mandibular arch during surgery. The surgical guide was used to ensure the future emergence of the implant was within the intaglio surface.Figure 11: Placing RidgeFit implants as parallel as possible in the mandible following the manufacturer's recommendation.Figure 12: A mandibular occlusal view of the final position of the implants before and after the tissue was sutured.Figure 13: Two-week post-operatory view of the surgical sites.Figure 14: A panoramic radiograph with the maxillary and mandibular implants.Figure 15: Maxillary and mandibular dentures with chairside temporary soft-tissue denture liner to avoid excessive pressure on the implants during osseointegration.Figure 16: Three months after surgery to allow sufficient time for osseointegration of the implants.Figure 17: Frontal view of the final position of the soft tissue around the implants and the readied matrix housings.Figure 18: Mandibular implants with the processing collar that block the area surrounding the Optiloc. Matrix housing with white retention insert.Figure 19: Mandibular overdenture after pickup of the housings utilizing chairside hard reline material.Figure 20: Maxillary implants with the processing collar that block out the area surrounding the Optiloc. Matrix Housing with white retention insert.Figure 21: Maxillary overdenture after pickup of the housings utilizing chairside hard reline material.Figure 22: Intraoral view of maxillary and mandibular overdentures.
Ricardo Mitrani, D.D.S., M.S.D., is a Spear Resident Faculty member.