Predictably Marking Tight Restorative Interdental Contacts
By Robert Winter on July 20, 2012 |When trying in an indirect restoration, a tight interdental contact may need to be marked and adjusted. Using the traditional technique of using articulating paper can be difficult, or at times seemingly impossible. The following process will help you to predictably accomplish this task.
1. The first challenge is to determine which contact is the one that is tight. Start the initial assessment by checking the restoration on the solid stone cast made by the laboratory. When holding the cast with the restoration seated up to a light, it should appear to be in contact with the adjacent tooth on each side. Then with the restoration still on the stone cast, check both sides of the restoration with AccuFilm II articulating paper to determine if the firm contact doesn't allow the paper to drag through when pulling.
It is up to the doctor to determine the degree of tightness or firmness that is acceptable to them. If the articulating paper doesn't drag through one of the contacts it is more likely to be the one that is tight in the mouth, and may need to have an adjustment made intraorally.
2. Place the restoration on the tooth and check the marginal adaptation by sight. Then use an explorer to tactilely feel if it is open or closed on the mesial, distal, buccal, and lingual aspects. If there is a slight opening on one of the proximal aspects, assume this is where the tight contact is located.
3. Check the contact with dental floss. There are many appropriate options depending on your personal preferences. Teflon tape glides through effortlessly while waxed dental tape may have more resistance. The restoration must be held firmly in place with an instrument, preferably in the central pit or incisal edge anteriorly.
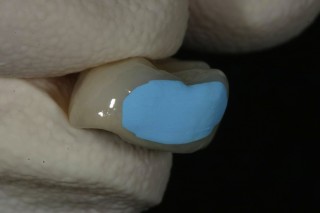
4. Remove the restoration, dry it, and then paint AccuFilm IV onto the proximal surface. (Below Left: AccuFilm IV) An alternative is to use an indelible marker. Dry the adjacent teeth intraorally with a cotton 2 x 2, high-speed evacuation, and air spray. Carefully slide the restoration onto the prepared tooth and apply firm pressure. Remove the restoration without rotation.
5. Even if you desire a broad contact, it will always appear to be hitting only a small spot. Make your adjustment using rubber wheels. A diamond is never recommended for this step. (Below Middle: Contact Marked, and Below Right: Straight handpiece using Brasseler's white ceramic knife edge 0310 polishing wheel adjusting contact). Finish polishing with Brasseler's gray Dialite R17FHP.


My preference for adjusting and polishing is to use a slow speed straight handpiece operating at 10,000 RPM to a maximum of 15,000 RPM. Options that can be used for e.max restorations with an intraoral latch handpiece are Dialite LD red medium W18MLD.RA followed by the fine yellow W18FLD.RA. For zirconia restorations, use the Dialite ZR green medium W18MZR.RA followed by the fine orange W18FZR.RA.