Rubber Dam Clamps, Floss Ties and Teflon Tape, Part 4
My previous article covered the essential armamentarium needed for effective rubber dam use in routine dental practice. Building on that foundation, this article will delve into the various options for rubber dam clamps, explore the benefits of floss ties, and examine the versatile use of Teflon tape. Each of these components plays a crucial role in enhancing the efficiency and effectiveness of rubber dam application, making this discussion vital for optimizing your dental procedures.
The benefits of quadrant and anterior tooth isolation
When placing a rubber dam, consider quadrant isolation for posterior teeth and, in my experience, isolating from the second premolar to the second premolar for anterior teeth. While isolating additional teeth may require only a small amount of extra time, it provides several notable benefits, including:
- Enhancing the overall visual perception of the operative field. You can see more because more light enters the area. Additionally, the operator can observe the relationship between the tooth they’re working on and the adjacent teeth. This is useful when performing direct resin work and aiming to mirror the line angles on a tooth in the opposite quadrant, which is critical for anterior teeth.
- Improving access. This is particularly important when working on areas that are challenging to see with direct vision (e.g., disto-palatals). Broader isolation improves the ability to use a mirror. Many dentists struggle to place their palatal stent to restore anterior teeth when the rubber dam is in situ. A common reason for this is that the isolated field is too restricted to accommodate the stent.
- Removing excess water. If the rubber dam clamp is placed away from the treated tooth (e.g., the second molar is clamped when working on the second premolar), water from irrigation tends to pool away from the tooth being worked on. This means it is easier for the assistant to effectively remove water without hindering the dentist. In addition, my experience shows there is far less splashing and fogging of the mirror when working indirectly.
- Scanning improvements. When preparing teeth for indirect restorations, the author scans the upper and lower arches and records the MIP position before placing the rubber dam while the local anesthetic is working. Quadrant rubber dam is placed, and the tooth is prepared. After preparation, the tooth is rescanned using the adjacent teeth as reference points. This makes impression scanning far easier and more efficient for onlays (and other supragingival restorations) because the tissue management stage is more efficient.
With these benefits in mind, let’s delve into the various options available for rubber dam clamps, floss ties, and Teflon tape. Each of these components plays a crucial role in optimizing the effectiveness of rubber dam application.
Selecting rubber dam clamps
There is a vast array of rubber dam clamps on the market today. I prefer to use only a few types because this simplifies inventory, reduces expenses, and improves communication between the dentist and the assistant.
Clamps may be winged or wingless. A wingless clamp is placed on the tooth, and then the dam is placed over it. In contrast, the rubber dam is placed on a winged clamp before being positioned on the tooth. I find the latter approach easier and more convenient.
The recommended clamps are:
- 00 for premolars and canines
- 2A for larger premolars
- 8A for molar teeth
- 212 for retraction of facial surfaces of anterior teeth
- Brinker B4 for retraction of premolar teeth and canines
Light particle abrasion (sandblasting) of the clamps with 29-micron alumina at low pressure (2 bar) is excellent for cleaning and reduces the glare of the metal clamp when photographing the area.
The function of floss ties
The use of floss ties has become increasingly popular in recent times. They fulfill the following functions:
- Improve the seal of the rubber dam margin, reducing the ingress of crevicular fluid, blood, and saliva.
- Retract the rubber dam and free the gingival margin/papillae, which will improve access when working on intrasulcular margins.
- When tied around the neck of a tooth and secured to the rubber dam frame, they can retract the rubber dam and prevent it from collapsing inward, thus improving access to facial surfaces.
- They also look impressive on lecture slides and social media images.
I prefer monofilament tape rather than braided floss. Conventional braided floss tends to become bonded to tooth structure during the adhesive stages of the procedure and can be extremely difficult, if not impossible, to remove. Tape (e.g., Oral-B Glide) is much simpler to remove and can be flicked off with a sharp curette or #12 scalpel.
There are many approaches to tying floss ties, and all have validity. My approach begins by cutting a 30-cm (12-inch) length of tape, which is used to floss all the contacts before placing the rubber dam. After the dam and frame are placeed, the dam is flossed through the contact points.
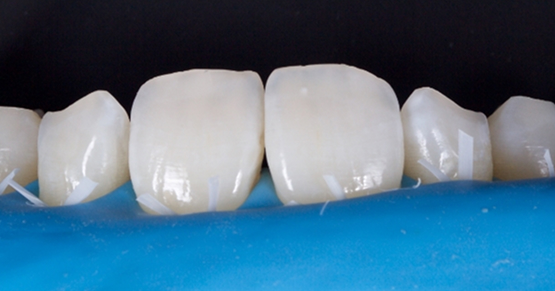
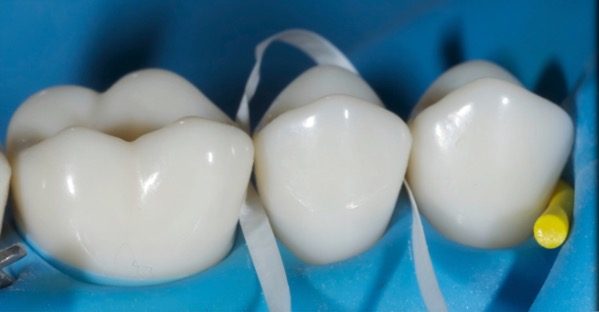
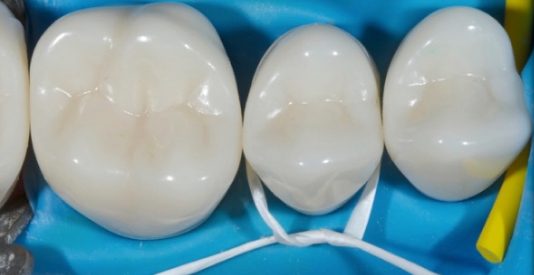
The tape is passed through one contact point of the tooth being worked on (Fig. 1), then looped around the palatal and passed through the other contact point, leaving two free ends on the facial (Fig. 2).
Next, the two free ends are crossed over each other on the facial and repeatedly pulled bucco-palatally. (A good analogy is the movement of a towel when you dry your back after a shower.) This movement tends to rapidly invert the rubber dam apically into the sulcus.
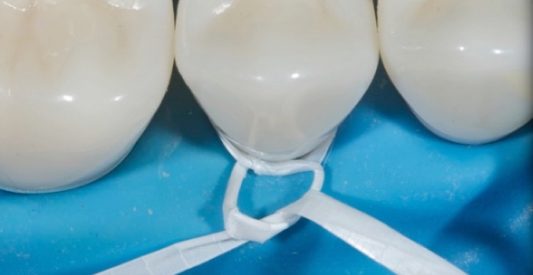
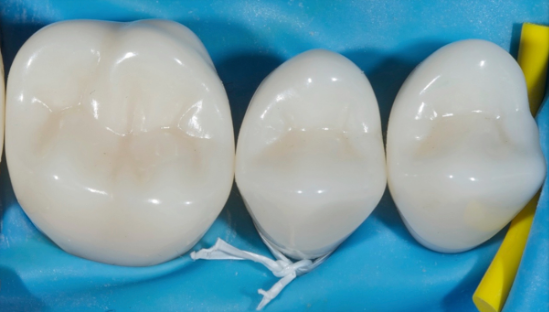
Then, a single loop (identical to the locking throw of a surgical knot) is tied between the two free ends, and the tape knot is tightened (Fig. 3). A double loop (identical to the first throw of a surgical knot) is placed on the two free ends, and the tape is tightened. On tightening, the tape is pulled apically — upward in the upper arch, downward in the lower arch (Fig. 4).
The two free ends can be tied to the rubber dam frame or cut short (5–10 mm, Fig. 5). If the operator elects to cut the tape, I find a 12-scalpel blade much easier than scissors.
When the procedure is complete, the tape should be removed. The easiest way to achieve this is to cut next to the knot with the tip of a #12 scalpel blade. The tape can then be easily pulled out with college tweezers.
Counting the number of floss ties used and ensuring they are all removed is good practice to avoid inadvertently leaving tape behind in the sulcus when the patient is dismissed. Failure to do so may result in gingival abscesses and poor tissue resolution.
Techniques for Teflon tape use
Teflon (PTFE thread seal tape) is beneficial in dental practice.
PTFE was discovered by accident in 1938 by DuPont chemist Roy Plunkett and was trademarked as Teflon. Teflon tape was developed by William Skidmore of Whitford Corp. in 1969 as a solution for sealing pipes.
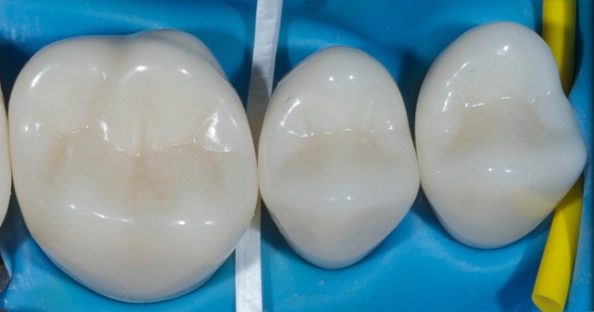
It comes in several thicknesses, with the most useful being those designed for gas pipes (thicker) and water pipes (thinner). I use the thinner water pipe tape for isolating teeth during bonding, because it passes between contacts and prevents deflection of indirect restorations, which can result in open contact points. Care must be taken during placement, because the tape tears very easily.
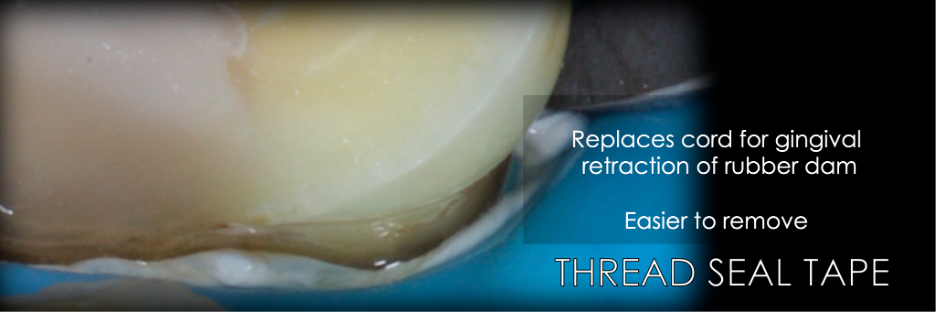
The tape can also be twisted into a braid and used as a retraction cord, with or without a rubber dam (Fig. 6). When margin isolation is required for bonding — for example, ceramic veneers or adhesive crowns — Teflon tape is often easier to remove than conventional retraction cord.
Other indications for Teflon tape
Because Teflon tape is thicker and heavier, it can be employed in several other usages.
Wedging interproximally
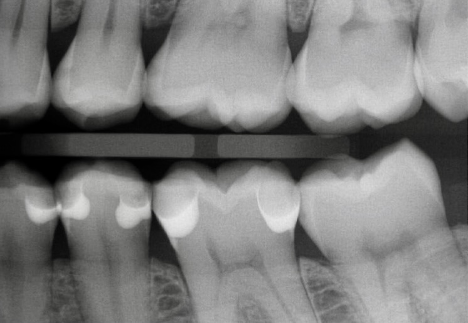
When wedging interproximally, Teflon tape often performs better than a wedge in areas of adverse anatomy, such as the fossa canina of the upper first premolar, because it freely adapts to any contour. The lower left in Fig. 7 shows Teflon tape being used as a wedge.
Covering screws
Teflon tape can cover screws in implant-retained restorations before placing composite resin.
Sealing canal access
Use Teflon tape to seal coronal canal access of pulp chambers after the first stage of endodontics. (To avoid doubt, a temporary restoration should be placed over the tape.)
Blocking undercuts
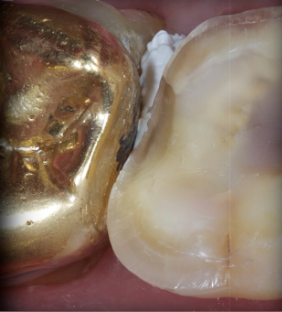
Blocking out interproximal undercuts when fabricating temporary restorations prevents the temporary restorative material from flowing into undercuts and breaking or locking in place when polymerized. The tape also provides good tissue retraction, and the pressure often achieves hemostasis. I often pack the tape (finishing 1 mm below the prepared margin), fabricate the temporary restoration, then leave the tape in situ for the impression or scan. The high contrast of the tape (Fig. 8) is picked up well in the scan.
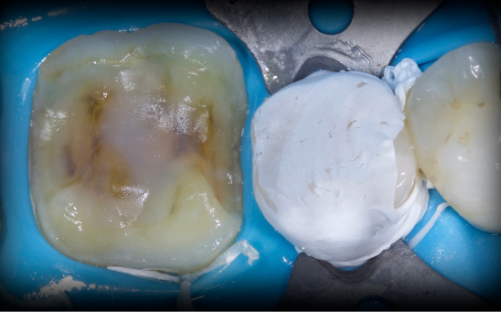
The tape is easily displaced during rinsing and drying procedures, and should ideally be anchored in position. The simplest and most secure way is to employ a rubber dam clamp (Fig. 9), such as an #8A (molar) or #2 (premolar).
Understanding and using the right tools and techniques for effective rubber dam placement can significantly enhance the quality of dental procedures. You can improve access, visibility, and patient outcomes by carefully selecting rubber dam clamps, floss ties, and Teflon tape.
Reference
- Gerdolle D, Browett S, Gresnigt MMM. (2023). The digital impression under rubber dam: Clinical insights for an accurate scan. Nederlands Tijdschrift Voor Tandheelkunde, 130(2), 73–79.
VIRTUAL SEMINARS
The Campus CE Experience
– Online, Anywhere
Spear Virtual Seminars give you versatility to refine your clinical skills following the same lessons that you would at the Spear Campus in Scottsdale — but from anywhere, as a safe online alternative to large-attendance campus events. Ask an advisor how your practice can take advantage of this new CE option.

By: Jason Smithson
Date: September 3, 2024
Featured Digest articles
Insights and advice from Spear Faculty and industry experts
