This article discusses managing a fractured denture base.

Background

Any time a prosthesis is removable by the patient, one of the risks dentists and their patients need to be aware of is damage to the prosthesis from being dropped.

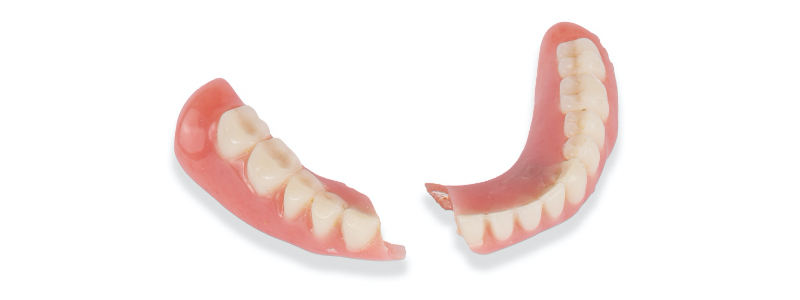
Dropping a removable prosthesis may result in chipped or broken teeth but very often results in a fractured denture base. And, while dropping the prosthesis is a common cause of fractured denture bases it is not the only cause. As a patient's arches resorb, it is not uncommon to see denture bases fracture due to stress concentrating in areas that haven't resorbed – the maxillary mid-palatal suture, for example.

As a result, fractured denture bases are a fairly common occurrence with this group of patients and, regardless of the cause, a fractured denture base can be an urgent concern for the patient. In many cases, the damaged prosthesis can be sent to the dental laboratory for repair, but what if the lab isn't available? In this article I want to share a case presentation for a patient in just this predicament.

Initial situation

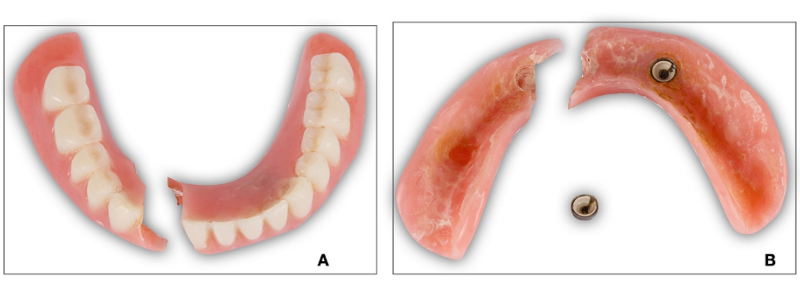
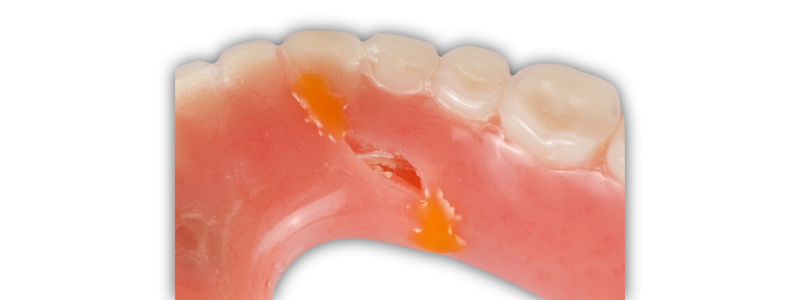
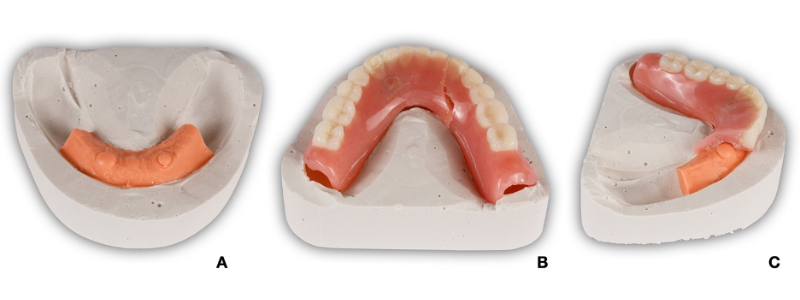
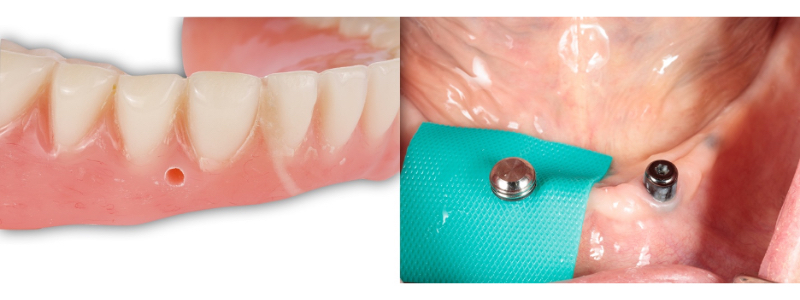
A 91-year-old female in good general health was referred for urgent repair of her existing lower denture. The patient had implants placed and both arches restored with implant-retained overdentures about seven years prior to this appointment. She is unsure about the last time she had the prostheses evaluated or adjusted. She notes they are “fitting loose.” Additionally, the patient reports two previous attempts by another dentist to repair the broken denture (Figure 1). When asked what she was doing when the denture broke? She is unsure and/or can't remember. Upon inspection, the mandibular prosthesis is a two-implant overdenture that has fractured right through the area of one of the attachment housings.

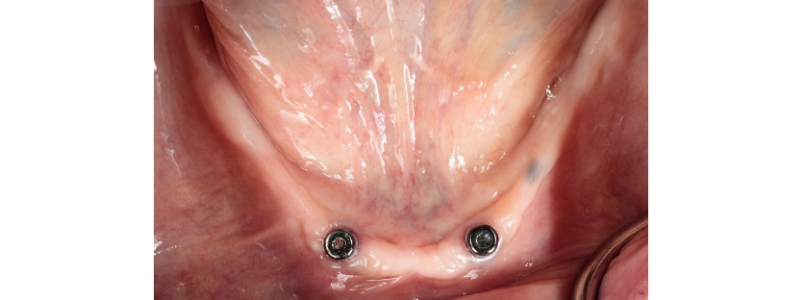
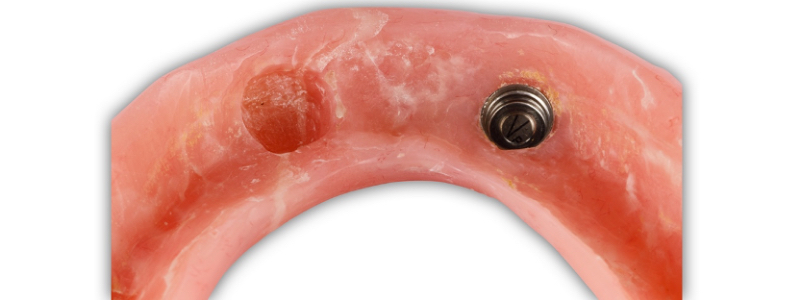
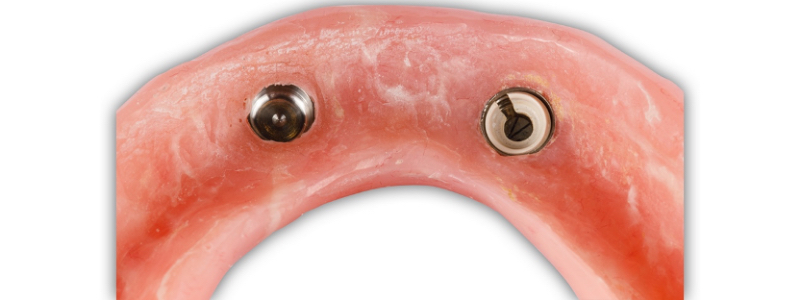
Clinically, the mandibular arch is significantly resorbed and two implant abutments are present, but the surface appears worn. While you may not recognize these abutments, the design concept with the mandibular prosthesis is the same as a two-implant Locator overdenture (Figure 2).

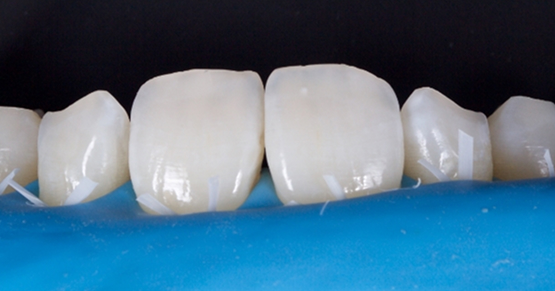
Figure 1. In Figure 1A, fibers from a previous repair are visible. Figure 1B reveals a more complex problem; the prosthesis is an overdenture and the denture base has fractured through the area of one of the housings.
Figure 2. Overdentures with this configuration are usually implant-assisted, meaning support for the prosthesis comes from both the implants and the conventional denture bearing areas. The residual ridges are narrow buccal-lingually and do not appear to have much vertical height; in addition to maintaining/replacing the retentive clips, this scenario requires routine evaluation of the need for relining the prosthesis.

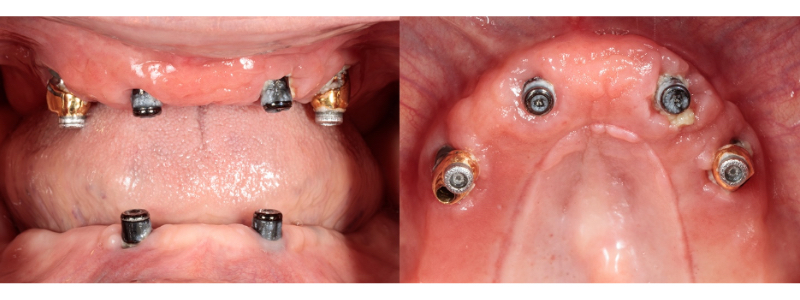
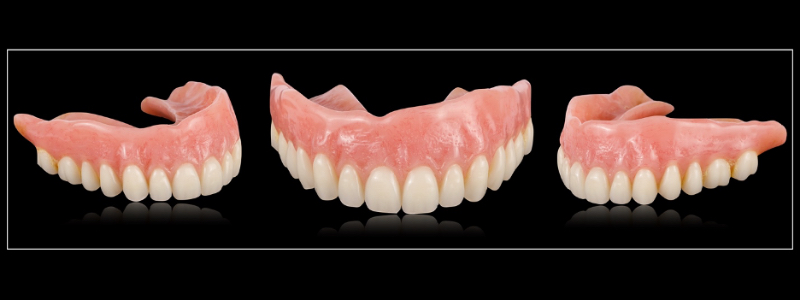
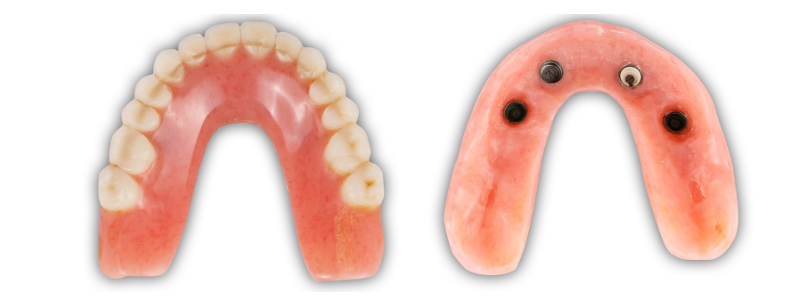
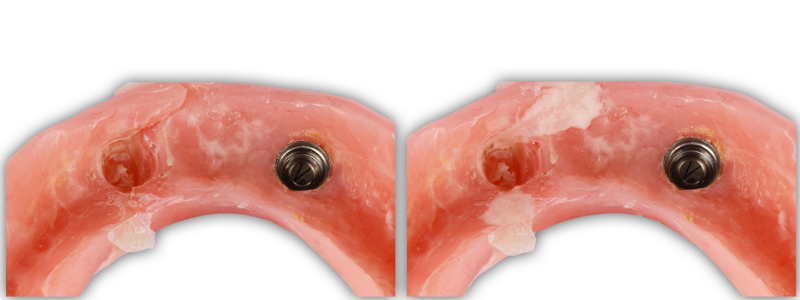
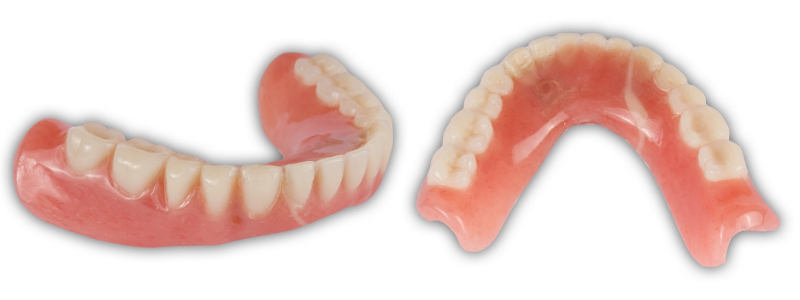
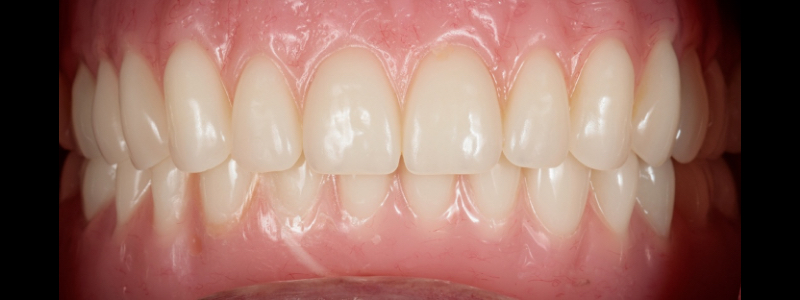
According to both the patient and the referring dentist, both the upper and lower arches were treated approximately seven years prior. Additionally, the patient confesses to wearing both dentures at night to help prevent wrinkles from forming. In the maxilla, two abutments similar to the mandibular abutments are present in the anterior while the posterior two abutments appear to be angle corrected and custom fabricated Locators (Figure 3). Despite the age of the case and the damage to the lower prosthesis, the maxillary prosthesis has managed to maintain its esthetics (Figure 4). Neither prosthesis has any type of metal reinforcement.

Figure 3. (left) The maxilla was restored with an overdenture at the same time the mandible was initially restored. (right) In the maxilla, the anterior abutments appear similar to the mandibular abutments, but the posterior abutments appear to be angle-correcting custom locators.
Figure 4. Despite the age of the prostheses, the esthetics of the maxillary overdenture does not appear to have been negatively affected.

Looking occlusally at the maxillary prosthesis, significant wear to the denture teeth is present. At seven years, this finding is not unexpected for conventional dentures and certainly to be expected with implant-retained overdentures (Figure 5 left, Figure 6). Interestingly, the maxillary overdenture had lost one of the retentive elements entirely and the remaining three retentive clips are not providing much retentive value (Figure 5 right).

Figure 5. The occlusal view of the existing maxillary prosthesis shows significant but not unexpected wear of the articulating surfaces of the denture teeth. The intaglio view shows retentive elements that differ between the anterior abutments and the posterior abutments. Additionally, the left anterior retentive clip is missing. Neither the upper nor the lower prosthesis are reinforced with a metal framework.
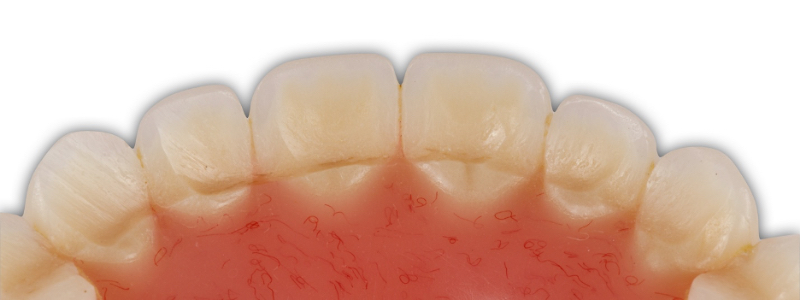
Figure 6. A close up view of the maxillary anterior acrylic denture tooth wear. It is not unusual for denture teeth to separate from the denture base or fracture under these conditions. Hats off to the technician!

Treatment planning

From a treatment planning perspective, this patient presents with two challenges. The first challenge is how to manage the urgent problem of the fractured denture base. The second challenge is determining options for her definitive care. Understandably, additional information will be required to come up with the definitive plan, but the patient is unwilling to go without a lower prosthesis while that plan is developed. In order to move forward, it is important for the patient to know that the repair to the lower overdenture will leave the denture weaker than it was originally and any factors that contributed to the denture base fracturing, such as stress concentration around the implant abutments, could compromise the weakened denture further.

Prosthetic procedures

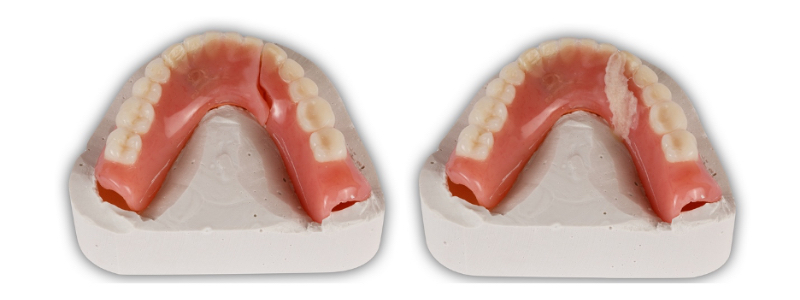
In this case, the patient desires strongly to have the lower denture repaired. For this particular repair, there are two distinct parts. Part one is to repair the fractured denture base and part two is to connect the attachment to the repaired denture base. The first step is to accurately reposition the denture base fragments (Figures 7 and 8). This step is critical as an error here could create problems with fit of the denture base to the ridge and occlusal discrepancies.
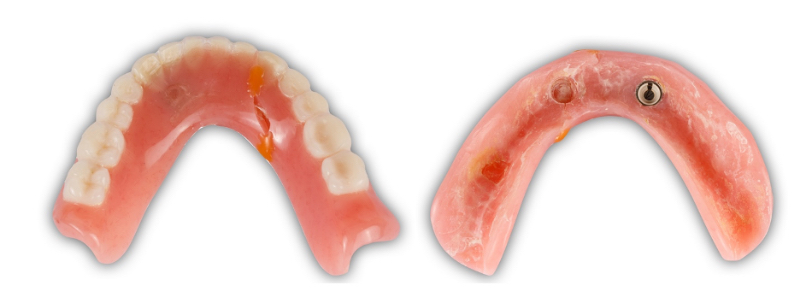
Figure 7. The first step in this repair is repositioning the remaining fragments. In this case, the fragments are held together with sticky wax but cyanoacrylate could be another option.
Figure 8. The fragments appear to be well positioned but there is a missing piece on the lingual.

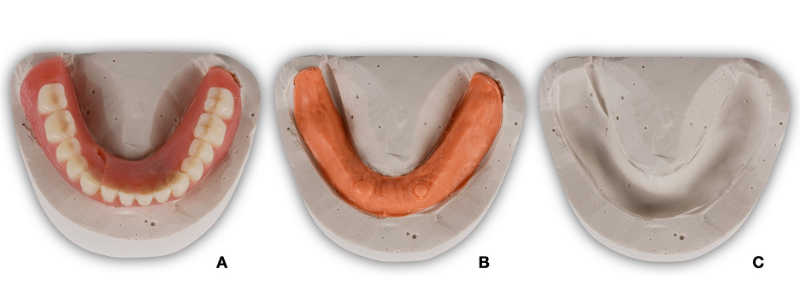
The next step is to fabricate some sort of a matrix to maintain the orientation of the fragments while the repair is being made. In this case, a remount cast is fabricated for this purpose (Figures 9 and 10).

Figure 9. Although the cast fabrication took additional time, it provides the benefit of a stable base for this repair and a subsequent repair should it be necessary. In addition, if an error is introduced during the repair procedure, the stone cast will serve as a control and will allow for a more efficient clinical remount to manage the occlusion.
Figure 10. The remount cast has been fabricated in such a way as to leave the denture borders contacting the stone. This rigid contact will have no rocking or bouncing, ensuring accuracy and repeatability in the positioning of the fragments. The laboratory silicone component of the remount cast has been removed from the distal extensions (Figure 10A) to avoid interfering with seating of the denture base (Figure 10B). The anterior portion of the silicone has been left in place to help prevent repair material from flowing excessively into the denture base intaglio (Figure 10C).

With the remount cast fabricated, the mandibular prosthesis is then carefully removed and the surface prepared for the repair material. In this case, the repair material selected is an autopolymerizing acrylic resin (Jet Acrylic, Lang) so the surface is roughened with a carbide bur and air abraded with 50 micron particles of aluminum oxide. (Figures 11, 12 and 13).

Figure 11. (left) Following fabrication of the remount cast with the luted denture base, the fragments are removed from the cast and the surfaces prepared for the repair material. In this case the repair material is an autopolymerizing PMMA (“cold-cure acrylic”). The gap at the fracture was kept as minimal as possible with a bevel away from the gap and the surfaces to be repaired air abraded with 50-micron aluminum oxide. (right) The repair acrylic has been added to the cameo surface of the lower prosthesis. Following application to this surface, the prosthesis was moved to a pressure pot and the repair material allowed to cure.
Figure 12. Now the prosthesis can be carefully removed from the remount cast (left) and additional material applied to the intaglio (right). The prosthesis is returned to the pressure pot and the repair PMMA allowed to polymerize.
Figure 13. The flash has been removed and the repair finished to allow for chairside pick-up of the attachment housing. One option would have been to use the existing housing and retentive clip, but since this abutment shares most of its geometry with the classic Locator, new Locator (extended range) components were utilized. The color difference between the repair material and the original denture base allowed for efficient flash visualization and removal.

With the denture base repaired, part two of the procedure is ready to begin; the chairside pick up (Figures 14 and 15).

Figure 14. In preparation of the chairside pick-up, a vent has been created in the denture base (left) and the attachment housing picked up in the usual fashion (right). Rather than the tooth-colored PMMA used for the repair, an injectable autopolymerizing pick-up material was used.
Figure 15. The new housing is attached to the repaired denture base.

Final result

The prosthesis is finished with carbide burs and polished using flour of pumice and denture polish on a rag wheel and lathe (Figure 16). Alternatively, a silicone polishing system could have been utilized.

The final result is then inserted (Figure 17).

Figure 16. Denture base repair and chairside pick-up completed. Note the pink material filling the vent from the pick-up (left) and the tooth-colored repair on the facial surface (left) and the larger repaired area on the lingual (right).
Figure 17. A “scar” from the repair procedure is visible with the lips retracted. Fortunately, there was no need to perform a clinical remount and equilibration with this case.

Conclusion

Denture base fracture is not an uncommon occurrence in practices who treat edentulous patients. While sending the prosthesis to the dental laboratory for repair is often a great option, there may be clinical circumstances that won't allow that to occur in a timely manner. In this article I've demonstrated one way to solve this problem, but there are countless other variations. I hope this helps next time you encounter this clinical problem.

References

  1. Gad M, Rahoma A, Abualsaud R, Al‐Thobity A, Fouda S. Effect of Repair Gap Width on the Strength of Denture Repair: An In Vitro Comparative Study. Journal of Prosthodontics. 2019;28(6):684-691. doi:10.1111/jopr.13091
  2. Kumar A, Badiyani B, Deb S et al. Impact of Surface Treatment with Different Repair Acrylic Resin on the Flexural Strength of Denture Base Resin: An In Vitro Study. J Contemp Dent Pract. 2020;21(10):1137-1140. doi:10.5005/jp-journals-10024-2892
  3. Abushowmi T, AlZaher Z, Almaskin D et al. Comparative Effect of Glass Fiber and Nano‐Filler Addition on Denture Repair Strength. Journal of Prosthodontics. 2019;29(3):261-268. doi:10.1111/jopr.13124